How to Get an International Driving Permit (IDP) with a U.S. Driver’s License

How to Get an International Driving Permit (IDP) with a U.S. Driver’s License

Hello, this is Maegami from Goddess’ Bangs.

Estimated reading time: 4 minutes

Earlier this year, I finally got my driver’s license in New York. During the summer, I also obtained an International Driving Permit (IDP) and drove in Japan for the very first time in my life.

In my previous article, I explained how to get a driver’s license in the United States. This time, I would like to share how to obtain an International Driving Permit using a U.S. driver’s license.

For people who hold a U.S. driver’s license, an International Driving Permit can be extremely useful when driving overseas. In this article, I’ll explain how to obtain one and what you should know before driving abroad.

What Is an International Driving Permit (IDP)?

An International Driving Permit (IDP) is essentially a translated version of your U.S. driver’s license. It allows local police officers and rental car companies in foreign countries to understand your driving credentials.

The IDP is recognized by the U.S. Department of Transportation (DOT) and can make overseas travel much smoother for drivers.

Requirements for Obtaining an IDP

To apply for an International Driving Permit in the United States, you must:

  • Have a valid U.S. driver’s license
  • Be at least 18 years old

Where Can You Get an International Driving Permit?

In the United States, IDPs are issued through:

  • AAA (American Automobile Association)
  • AATA (American Automobile Touring Alliance)

How to Apply for an International Driving Permit

1. Prepare the Application Form

Download the application form from the AAA or AATA website.

You can:

  • Print and fill it out in advance
  • Or complete the application form at the office

2. Prepare the Required Documents

You will need:

  • A copy of your valid U.S. driver’s license
  • Two passport-sized photos taken within the last six months
    (Some offices can take photos for you on-site.)
  • Application fee
    (Usually around $20, but check the official website for the latest pricing.)

3. Submit Your Application

Bring the documents and fee to your nearest AAA or AATA office. New York Location

You can also apply by mail by sending the required documents and payment to the designated address.

4. Receive Your International Driving Permit

Once your application is processed, your IDP is usually issued on the same day or within a few days.

Important Things to Know When Using an IDP Abroad

Always Carry Both Licenses

You must carry:

  • Your International Driving Permit
  • Your original U.S. driver’s license

The IDP alone is not valid without your actual license.

Validity Period

An International Driving Permit is generally valid for one year from the date of issue.

If it expires, you will need to apply for a new one.

Renting a Car Overseas

In many countries, rental car companies will ask to see your IDP before allowing you to rent a vehicle.

However, rules vary by country, so it is important to check local regulations before traveling.

Tips for Driving Overseas

Learn Local Traffic Rules

Traffic laws can differ greatly from those in the United States.

Before driving abroad, take time to review:

  • Road signs
  • Speed limits
  • Parking regulations
  • Local driving customs

Insurance Matters

Make sure you have appropriate insurance coverage.

If you are renting a car, it is usually a good idea to purchase insurance offered by the rental car company.

Parking Information

Parking systems and rules vary widely depending on the country.

Research:

  • Parking locations
  • Fees
  • Restrictions
    before your trip to avoid unnecessary stress.

Final Thoughts

Getting an International Driving Permit with a U.S. driver’s license is actually a simple process and can make traveling abroad much easier.

I hope this guide helps you prepare for safe and enjoyable driving overseas.

For the latest information and application details, please check the official AAA or AATA websites before applying.

Getting a NYC Driver’s License in New York City

Getting a NYC Driver’s License

Hey everyone, it’s Maegami from The Goddess’ Bangs!

If you’re living in New York and thinking about getting a driver’s license, you might be a little intimidated. Trust me—I was too. I failed my first road test, felt like giving up, but after practicing more, I finally passed. Now I want to share my personal journey, along with practical tips for anyone Japanese (or just new to NYC) who wants to drive in this city.

DMV Website

Step 1: Make Sure You’re Eligible

Here’s the deal:

  • You need to be 16 or older.
  • You must have proof of New York residency (like a utility bill or lease).
  • Non-US citizens, don’t forget your passport or other official ID.

Starting with the basics will save you headaches later.

Step 2: Get Your Learner Permit

The learner permit is your first step. Here’s what I did:

  1. Fill out form MV‑44 online or at the DMV.
  2. Bring your ID documents—the DMV has a handy checklist.
  3. Schedule the written test. You can usually do this online.
  4. Study, study, study the New York Driver’s Manual. Chapters 4–11 are your best friends.

Once you pass, you’ll get your Learner Permit, which allows you to practice driving with someone over 21 in the passenger seat.

Step 3: Practice Driving

NYC streets are intense, so practice is key.

  • I went out 12 times before my road test.
  • Make sure you practice parallel parking—this is where most people fail (including me the first time!).
  • Pay attention to intersections, lane changes, and signaling—NYC drivers are unpredictable, so stay alert.

Step 4: Take the Road Test

When you feel ready:

  1. Schedule your road test online or through a driving school. Schools often provide the car, which is a huge help.
  2. Bring your learner permit and pre-licensing certificate (MV‑278).
  3. Drive like you mean it—but stay calm. The examiner will check your parking, turns, lane changes, and general traffic awareness.

I failed my first test because I wasn’t confident with parallel parking. My advice? Practice until it feels natural, even in tight spots.

Step 5: Get Your Full License

Passed your road test? Congrats! Your NY driver’s license will arrive in the mail in about a week and a half. You’re officially ready to drive around the city!

My Top NYC Road Test Tips for Japanese Residents

  • Study the Driver’s Manual thoroughly—especially road signs.
  • Signal everything and check your mirrors—examiners notice small details.
  • Parallel parking is a must—practice on quiet streets first.
  • Stay calm—even if you make a minor mistake, keep going.
  • Failing isn’t the end—learn from it and try again with confidence.

Why Getting a NY License is Worth It

For Japanese residents, having a New York license is more than just convenience:

  • It helps you navigate NYC’s busy streets safely.
  • You can rent cars or drive in neighboring states without hassle.
  • If you plan to return to Japan, your experience can sometimes help with international driving permits.

Final Thoughts

Getting a NYC driver’s license isn’t easy, but it’s doable. My journey was full of mistakes, practice, and finally, success. If you’re a Japanese resident thinking about driving in New York, take it step by step, practice as much as you can, and don’t give up!

Drive safely, and enjoy the ride.

How to Get Global Entry | A Complete Guide for New York Residents

How to Get Global Entry | A Complete Guide for New York Residents

If you live in New York—or anywhere in the U.S.—and have recently become a U.S. citizen or received your green card, the Global Entry program can make your international travel much smoother. In this guide, we’ll explain what Global Entry is, who qualifies, and how you can apply step by step.

Estimated reading time: 3 minutes

What Is the Global Entry Program?

Global Entry is a trusted traveler program managed by U.S. Customs and Border Protection (CBP). It allows pre-approved, low-risk travelers to use automated kiosks at airports and skip long immigration lines when entering the United States.

My husband and I applied for Global Entry, and within a few months we were approved and received our Global Entry ID. Since then, re-entering the U.S. after international travel has been much faster and stress-free.

Eligibility Requirements for Global Entry

To apply for Global Entry, you must meet the following conditions:

  • Be a U.S. citizen or lawful permanent resident (green card holder)
  • Have no criminal record

In addition, citizens from several partner countries can also apply, including:

  • Germany
  • Singapore
  • Mexico
  • Colombia
  • Panama
  • South Korea
  • New Zealand
  • Canada
  • Australia
  • Argentina
  • India
  • Switzerland
  • Taiwan

How to Apply for Global Entry

  1. Submit an application online through the official Global Entry website.
  2. Provide personal details such as employment history, vehicle information, passport details, and criminal history.
  3. Pay the $100 non-refundable fee, valid for 5 years.

The Global Entry Interview

Once your application is conditionally approved, you’ll receive an email notification. You’ll then need to schedule an interview at an enrollment center.

I completed my interview at JFK Airport, Terminal 4. Even if your green card hasn’t arrived yet, bringing proof of your permanent residency application fee receipt is usually sufficient.

Things to Remember After Approval

Once you have Global Entry, keep these points in mind:

  • At check-in, notify the airline that you’re a Global Entry member.
  • Use the TSA PreCheck security lane, which is included with your membership.
  • Global Entry also works for connecting flights from countries like Canada.

Benefits of Global Entr

Here are the main advantages of joining the Global Entry program:

  • Save time at immigration when re-entering the U.S.
  • Skip long security lines with TSA PreCheck access.
  • Less stress and fatigue after long flights.
  • Better chance of making tight connections between international and domestic flights.

Conclusion

For New Yorkers who travel abroad often—especially new green card holders and U.S. citizens—the Global Entry program is a game-changer. By reducing wait times and simplifying security checks, it makes international travel smoother and more enjoyable.

If you’re planning to travel frequently, applying for Global Entry is definitely worth considering!

You wanna visit the Guggenheim Museum

What is the Guggenheim Museum?

It is a modern and contemporary art museum. Its exterior and interior are famously shaped like a snail shell. It was designed in 1943 by Frank Lloyd Wright, a master of American modern architecture.

The museum is located on the east side of Central Park, at the intersection of 88th Street and Fifth Avenue. Two blocks north, you’ll find the Cooper Hewitt Museum.

What’s on Display at the Guggenheim Museum?

The most famous art museum in New York, the Metropolitan Museum of Art, exhibits everything from ancient art to contemporary works. For example, it displays African and Egyptian art from as far back as the BC era, moving through Impressionism and Modern art, and even has a section dedicated to the development of musical instruments. Its scale is so large that one day wouldn’t be enough to explore it all.

In contrast, the Guggenheim Museum focuses on modern and contemporary art. It showcases the political and cultural concepts expressed by artists who are still active today. Through art, it reflects the complexity of current global social issues. The Guggenheim allows you to experience the ever-changing nature of art in real time, and this is one of its defining features.

Difference Between the Guggenheim and MoMA

I haven’t introduced MoMA (the Museum of Modern Art) yet, but the differences between the two are clear. MoMA is for those who love modern design. The Guggenheim, on the other hand, is more about experiencing art in the broader sense, including contemporary concepts.

For example, if you’re someone who enjoys stylish designs, graphic art, and fashion, MoMA would be a great fit. You could also stop by MoMA’s shop to buy trendy kitchen furniture or small souvenirs.

The Guggenheim, however, offers a deeper experience if you can understand the content and concepts behind the art. It makes you think deeply and might even lead to personal insights. So, instead of just looking at the artwork, it encourages contemplation.

Personal Reflection

Even though I’ve lived in New York for 20 years, I only visited the Guggenheim Museum for the first time recently. I wonder why I kept putting it off—maybe it felt intimidating, or perhaps I wasn’t sure if it was a place I belonged. Also, the entrance fee is higher than the Metropolitan Museum of Art.

Perks for New Yorkers

The Metropolitan Museum of Art and the Natural History Museum (which has removed its Native American exhibits; here’s an article from the NY Times) allow New York residents to enter with a donation instead of paying full price. So, I was able to visit for just one or two dollars.

However, the Guggenheim Museum doesn’t allow entry through donations. This is probably because the modern art displayed is by living artists, which makes it a paid exhibition. The general entry fee is $30 (about 4300 yen). While children can visit, I personally think the Guggenheim is not ideal for very young children.

Where is the Guggenheim Museum?

It’s located on Fifth Avenue and 88th Street in the Upper East Side. It might seem far from areas like Times Square, but Manhattan is quite walkable. For instance, I’ve walked all the way from the Upper East Side to the East Village (laughs).

You can take the green subway lines 4 and 5 (Express) or the 6 line (Local) from Grand Central to the 86th Street station. Alternatively, you can take an Uber, Lyft, or yellow taxi, or use CitiBike, although I would not recommend biking for tourists due to safety concerns (there have been incidents with European tourists in the past).

Must-See Highlights at the Guggenheim Museum #1: The Tannhäuser Collection

The Tannhäuser Collection is a collection of paintings gathered by a German art collector and dealer named Tannhäuser. It includes rare works by artists such as Van Gogh, Picasso, Manet, Monet, and Renoir.

One example is Pablo Picasso’s ambitious painting “Moulin de la Galette” (1900), created when he was just 19 years old. This painting is featured in the New York Times article, and I encourage you to read it if you’re interested. I was particularly struck by the woman’s mouth in the painting, which seems to draw attention.

Another highlight is Van Gogh’s “Mountains at Saint-Rémy,” painted during his time in a psychiatric hospital. The details of the sunflowers in the painting make you reflect on why they are depicted in such a manner.

There are many more fascinating works in this collection, along with explanations about the artists’ circumstances at the time. I think it’s important to be able to read English to fully enjoy this aspect.

Must-See Highlights at the Guggenheim Museum #2: Inspiring Visitors

For me, one of the most inspiring things about the museum was seeing the people around me. I think one of the joys of living in New York is experiencing its unique atmosphere. Of course, visiting iconic landmarks like the Statue of Liberty and Times Square is great, but there’s also a unique vibe to New York’s cool and artistic crowd. You’ll often spot stylish, monochromatic-dressed people. You can get a taste of this vibe in the short video below, accompanied by Philip Glass’s piano music.

Must-See Highlights at the Guggenheim Museum #3: The Museum Café

I also visited the café inside the museum, which I highly recommend to New Yorkers as well. It’s the perfect place to get your artistic mindset elevated.

Summary

In this post, I introduced the Guggenheim Museum. I didn’t mention this in the highlights, but the current exhibition theme is “Going Dark.” This exhibition features works by black, Middle Eastern, and indigenous women artists, exploring the theme of visibility. Each piece expresses their experiences in a society where their presence is often barely seen. The conceptual representations are thought-provoking, and some of the works are truly striking. If you’re interested, I highly recommend you visit the museum!

NYC Subway My Terrifying Experience: What Happened and How to Stay Safe

NYC Subway My Terrifying Experience: What Happened and How to Stay Safe


New York City is known for its energy, diversity, and fast-paced lifestyle—but it can also surprise you with occasional moments of danger. Although NYC has become safer in recent years, unpredictable encounters can still happen, especially on the subway. Today, I’m sharing a real-life experience that shook me to the core, along with practical safety tips every commuter should know.

A Quiet Afternoon Ride Turned Into Chao

On what seemed like an ordinary weekday, I boarded a local Manhattan subway with only a handful of passengers in the car. As the doors were closing, a visibly unstable man rushed toward the train and became trapped between the doors.


Moments later, he entered the car and exploded into a violent outburst—shouting profanities, kicking the doors, and pacing aggressively only inches away from me.

This terrifying moment reminded me how unpredictable public transportation can be, even in a safer New York.

Why NYC Subways Still Face Safety Challenges

While overall safety has improved—with more police presence and cleaner stations—major issues remain:

  • Fare evasion brings unmonitored individuals into the system
  • Mentally unstable individuals often use the subway as shelter
  • Overcrowding and understaffing lead to unpredictable environments

These factors create conditions where sudden incidents can occur without warning.

What To Do If You Encounter an Aggressive Person on the Subway

From this experience, here are key survival tactics:

1. Don’t Make Eye Contact

Aggressive individuals may interpret it as a challenge.

2. Stay Calm and Don’t React Emotionally

Neutral body language reduces the chance of escalation.

3. Don’t Look Down Completely

You need to maintain awareness of their movements.

4. Have an Exit Plan

Know where the nearest doors are and move at the next stop if possible.

5. Wear Shoes You Can Move In

Sneakers give you better stability and mobility.

These small decisions can significantly improve your safety during unpredictable moments.

What NYC Riders Should Expect Going Into Winter

Shorter days and darker evenings can make subway travel feel more intimidating. Consider alternatives when necessary:

  • Choose buses or taxis during late hours
  • Travel with friends when possible
  • Avoid crowded or isolated areas of the platform
  • Stay aware and avoid distractions like loud headphones

Manhattan’s population continues to grow, meaning more people—and potentially more unpredictable encounters.

Final Thoughts

Despite this frightening moment, NYC remains a vibrant and exciting place to live. The key is staying aware, confident, and prepared. With the right safety mindset, you can enjoy the city while protecting yourself from unexpected situations.

Stay safe—and stay strong—because New York always keeps you on your toes.

Is New York Safe to Visit Now in 2023 for Japanese Travelers?

Is New York Safe to Visit Now in 2023 for Japanese Travelers?

The Pandemic’s Impact on New York City

The pandemic that began in 2020 turned New York City into a ghost town. Streets once full of people became silent, and crime rates rose sharply.
In 2021, the rise of Asian Hate crimes shocked the world. Many believed people who had shifted to remote work would never return to the city.

It’s true — working from home became common. Yet, surprisingly, Manhattan has once again filled with people. The energy of the city is back! In this article, we’ll explore the current safety and subway conditions in New York City as of September 2023 — my final safety report since the pandemic began.

New York Has Always Been a Dangerous City

New York has never been known as a perfectly safe place — it’s always had an edge.
When I lived in the Lower East Side in the early 2000s, however, the city transformed. Streets grew lively, neighborhoods improved, and safety increased dramatically.

This was largely thanks to city leadership at the time. Those struggling with mental health issues were moved to shelters, and criminals were sent to prison. You could enjoy a night out, ride the subway, or take a taxi home late at night without much worry.

But during the pandemic, prison and shelter systems became overwhelmed, and many people were released. Unfortunately, this led to a temporary decline in safety.

New York in 2023: Almost Back to Normal

Today, New York feels almost back to its pre-pandemic rhythm.
While occasional reports of Asian Hate still surface, the city overall feels much safer than in 2021–2022. You’ll still see some homeless individuals or people struggling mentally, but subway ridership has surged again — which naturally increases safety.

Police presence is strong across stations and streets, and visitors can feel a greater sense of security. In short, New York has regained much of its old energy.

Staying Safe in New York at Night

Some things never change — especially nighttime safety tips.
Always be aware of your surroundings when walking, and avoid deserted streets. When returning home late, it’s best to use Uber, Lyft, or a yellow cab instead of walking or taking the subway alone.

Remember: “Safe” in New York doesn’t mean risk-free. It means knowing how to move smartly.

Final Thoughts

This is my final update on New York’s safety since the pandemic. Many readers have shown strong interest in this topic, so I wanted to share one last look.

New York is never perfectly safe — and that’s part of its wild charm. Stay alert, but don’t be afraid to enjoy it. The city is alive again, and you can finally experience the vibrant, pre-pandemic New York once more.

Lost Items on the Shinkansen- visita Iida Bashi[飯田橋駅]

Lost Items on the Shinkansen

I left my e-book on the Shinkansen during my travels in Japan this summer while using the Japan Rail Pass. After a wonderful trip, I was carrying a lot of souvenirs, which made my hands full, and I must have forgotten the e-book on the train. I suspect that when I tried to put it into my bag, it slipped and fell out. I remember placing it into my bag, so I assumed it had fallen somewhere under the seat of the Shinkansen, which I remembered being in the 1st car. With that memory, I figured there was a good chance I could find it. Here’s how the e-book made its way back to me.

Registering Through the Chat

First, I visited the lost item notification page. Once there, I started a chat with the Shiba Inu mascot.

However, I found out that I couldn’t use the lost item chat from the U.S. (since I was overseas), so I had to explain the process in text instead. Here’s how the process works:

Lost Item Chat Description

The Shiba Inu mascot will ask you a few questions. First, you’ll need to provide the location and date you lost the item. Since I remembered the exact spot where I lost it, I gave the train type, date, and seat number, along with detailed descriptions of the item, including the color. You can select from available options, but I recommend writing the specific color in the input field. Even if the category doesn’t match exactly, it’s not a problem, as there’s a section for you to explain in your own words.

After Completing the Chat Registration

Once you’ve completed the chat, you’ll receive a registration number via email. It may take a few days for them to search for your lost item, as they are careful, especially if it’s a high-value item, to ensure they match it correctly.

JR Tokyo Station Lost & Found Center

If your lost item is found, you will be notified that something similar to your description has been located. The item will be moved to the Lost & Found Center at Tokyo Station. However, the items are only kept for a limited period, so if you are traveling outside Tokyo, you may not be able to pick it up right away. In my case, I couldn’t make it to Tokyo Station in time before the storage period expired.

Visiting the Lost & Found Center at Iidabashi

When the holding period at Tokyo Station expires, the lost items are transferred to the Iidabashi Police Station’s Lost & Found Center. It’s quite easy to get there: I took the JR Yamanote Line and got off at Iidabashi Station. There are large signs directing you to the Lost & Found Center.

What to Do if You Forget Your ID

Since I live overseas, my passport serves as my ID. Unfortunately, I forgot to bring it with me. However, I was able to use my credit cards as ID. The key is to describe the lost item as specifically as possible. In my case, it was an English-language e-book, which made it easier to identify since there weren’t many similar examples. For items like wallets or valuables, it’s best to bring your ID and be prepared to explain the contents and condition of the lost item.

Summary

In this article, I explained the steps for dealing with lost items on the Shinkansen. If you can’t pick up your item at Tokyo Station, you can go to the Iidabashi Lost & Found Center. Don’t give up if you lose something—head to Iidabashi to pick it up!

飯田橋遺失物センターの入り口の写真

Why the U.S. I-94 Travel Record Matters: My Experience with Green Card and Visa Applications

Why the U.S. I-94 Travel Record Matters: My Experience with Green Card and Visa Applications

I-94 image cover photo

Estimated reading time: 3 minutes

Losing an I-94 Form Can Change Everything

Not long ago, a friend of mine was preparing her green card application when she realized something terrible—she had lost her I-94 Form, the U.S. entry and exit record. Even worse, it was from before 2015, back when the I-94 was a white paper card stapled to your passport.

Today, I-94 records are available online, but only for the past five years. Older records? You’re on your own.

In her case, there was even a gap in her travel history. She had to prove exactly when she had entered the U.S. Luckily, I had entered with her years ago. I wrote a detailed statement about that day, had it notarized, and mailed it to her as supporting evidence. I can only hope it helps her case.

This experience reminded me how important the I-94 truly is—not just a piece of paper or a digital file, but a document that can decide your future in the U.S.

What Exactly Is the I-94 Form?

The I-94 is an official U.S. Customs and Border Protection (CBP) record that shows:

  • The date you entered the U.S.
  • The country you traveled from (Japan, China, etc.)
  • Your authorized period of stay

Before 2015, the I-94 was a physical white slip of paper, often carelessly stapled into passports. After 2015, CBP moved the system online. Now you can retrieve your travel history electronically—but remember, the system only stores the last five years.

Why the I-94 Is So Important

You may be surprised how often this little record is needed:

  • Green card (permanent residency) applications – USCIS often asks for it.
  • Visa renewals – I personally had to provide copies of my old paper I-94s.
  • University procedures – students must show entry and exit records every time they travel abroad.
  • Proof of legal entry – if there are questions about your status, this record can protect you.

In short: without your I-94, you may not be able to prove you are in the U.S. legally.

How to Get Your I-94 Record

If you entered after 2015, the process is simple: go to the official CBP website, enter your passport details, and download your record for free.

But if your entries were before 2015, things get complicated. You may need to show alternative documents or provide sworn statements, like my friend did. That’s why keeping every document safe is so important.

Final Thoughts

Living in another country means respecting its rules—and keeping track of your records. The U.S. I-94 travel record may seem small, but it can have a huge impact on your future.

Whether you are applying for a student visa, an artist visa, or a green card, remember: your I-94 is proof that you entered the U.S. legally. Keep it safe, and know how to access it when needed.

Back to Home

Is the Japan Rail Pass Worth It in 2025? A Complete Guide for American Travelers

Is the Japan Rail Pass Worth It in 2025? A Complete Guide for American Travelers

What is the Japan Rail Pass?

The Japan Rail Pass (JR Pass) –Website-is a special ticket designed for foreign tourists. It allows unlimited travel on most JR trains — including Shinkansen (bullet trains) — within a set period (7, 14, or 21 days). However, note that it cannot be used on Nozomi or Mizuho services. Seat reservations are possible, which is especially useful during peak seasons.

For travelers who want to explore Japan by train, this pass can be a convenient option. But with the major price increase in October 2023, many are asking: is it still worth it in 2025?

Latest Japan Rail Pass Prices (2025)

As of 2025, the official JR Pass prices are:

  • 7-day Ordinary: ¥50,000 (~$330)
  • 14-day Ordinary: ¥80,000 (~$535)
  • 21-day Ordinary: ¥100,000 (~$670)

Green Car (First Class):

  • 7-day: ¥70,000
  • 14-day: ¥110,000
  • 21-day: ¥140,000

💡 Note: USD amounts depend on the exchange rate.

When Does the JR Pass Make Sense?

For American travelers, the pass is most valuable if you:

  • Plan multi-city travel: Tokyo → Kyoto → Hiroshima → Osaka.
  • Take several long-distance rides within a short time.
  • Want the freedom to hop on and off JR trains without buying separate tickets.

Example:

  • Tokyo → Kyoto round-trip (~$220)
  • Kyoto → Hiroshima (~$90)
  • Hiroshima → Tokyo (~$180)
    Total = ~$490 → A 7-day JR Pass ($330) saves you money.

When the JR Pass May Not Be Worth It

  • If you mainly stay in one city (Tokyo, Osaka).
  • If your trip is slow-paced with limited long-distance travel.
  • If regional passes (like Kansai or JR East) cover your itinerary more cheaply.

Buying the JR Pass in the U.S.

You must purchase the pass before arriving in Japan. In New York and other U.S. cities, you can buy from travel agencies such as:

  • Amnet
  • HIS
  • IACE Travel

Some agencies may offer slightly cheaper prices in USD. For example, one traveler bought a 7-day pass via Amnet for $220, picking it up directly at their Manhattan office.

Special Case: Japanese Nationals Living Abroad

Though intended for foreign tourists, some Japanese nationals abroad can qualify if they:

  • Hold a U.S. Green Card for 10+ years (valid only for U.S., Canada, Brazil).
  • Provide a Certificate of Overseas Residence proving 10 years abroad.
  • Submit a copy of the Residence Registration (在留届の写し) from the Japanese consulate.

If you don’t meet these, you may not be eligible.

Tips for Using the JR Pass

  • Activate wisely: Start your pass on the day of your first long-distance trip.
  • Reserve seats: Shinkansen can get crowded, especially during holidays.
  • Bring documents: Passport is always required when using the pass.
  • Compare costs: Sometimes, regional passes or single tickets are cheaper.

Conclusion

The Japan Rail Pass remains one of the most convenient ways to explore Japan — but after the 2023 price increase, it’s not always the automatic money-saver it once was. For Americans planning to visit multiple cities, it can still offer great value. The key is to calculate your route costs and decide if the pass is right for you.

How to Use OMNY on NYC Buses | Transfers, Fares & Patrol Checks

How to Use OMNY on NYC Buses | Transfers, Fares & Patrol Checks

Hello! This is Maegami from the blog Goddess’ Bangs.
In New York City, OMNY is the new contactless payment system for subways and buses — similar to Japan’s PASMO, except it’s linked directly to your credit or debit card.

Estimated reading time: 3 minutes

[word_balloon id=”1″ size=”M” position=”L” radius=”true” name=”” balloon=”talk” balloon_shadow=”true”]

The bus is getting faster than ever- I see some improvement

[/word_balloon]

In this article, I’ll explain how to use OMNY on buses, including transfers, patrol checks, and things to watch out for.

Using OMNY on Buses

When you tap in with OMNY (or even a MetroCard), you automatically get one free bus transfer within two hours.

Important notes:

  • Subway-to-subway transfers are not possible with OMNY (same as MetroCard).
  • The free transfer is valid bus-to-bus or subway-to-bus only.

So if you first take the subway and then transfer to a bus within two hours, your bus ride will be free.

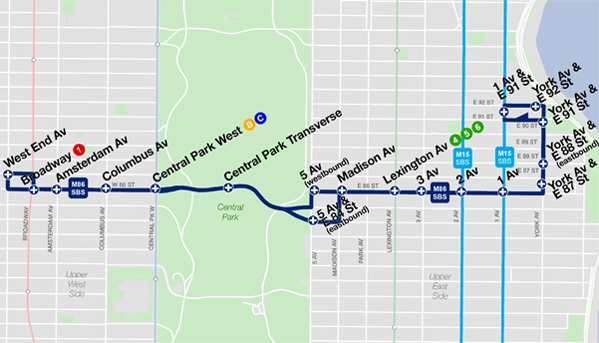
Special Case: Crosstown Buses on 86th Street

MTA buses in Manhattan, especially the crosstown routes, often use articulated buses (the long ones with two connected sections).

Unlike regular buses where passengers board only from the front, in New York you can also board from the middle or back doors. This helps save time during rush hour — but it also means some people try to ride without paying.

Because of this, MTA patrol officers occasionally board these buses to check payments.

Patrol Checks & Fines

Alt="New York City articulated crosstown bus on 86th Street"

If you’re riding without paying, you could face a $100 fine.

Here’s how it works:

  • MTA officers carry a device that scans your OMNY payment status.
  • If your payment shows as VALID, you’re safe.
  • If not, you’ll be asked to exit, give your personal details, and later pay the fine.

So even if it seems easy to sneak on, it’s not worth the risk. Always tap your OMNY card or phone before riding.

Can You Transfer Bus to Bus with OMNY?

Yes! If you tap into one bus, you can transfer to another bus for free within 2 hours.

However, a third transfer is not included. For example:

  • First bus → free transfer to second bus → third bus requires a new fare.

Conclusion

OMNY makes paying for New York City buses easy and fast, with free transfers included. Just remember:

  • Always tap in, even if the bus looks open.
  • Watch out for patrol checks — fines are expensive.
  • Use your 2-hour transfer wisely.

With OMNY, buses can be just as convenient as the subway.